

Used Enterprise Hard Drives: HUS726T6TALE6L4 Tested in Unraid
Published: 8 Kasım 2026
Used enterprise hard drives are often the cheapest way to add big storage to a home server, but only if the drive you receive is a good one. So I tested my luck, and my own advice I’ve been dishing out; I bought a used 6TB enterprise drive on eBay UK, wrote down every step with screenshots, and tested it before I trusted it: SMART data, an extended self-test, a 25-hour Unraid Preclear, and then adding it to my array.
The short answer
Is a used enterprise hard drive worth buying? For my Unraid server, yes, and mine cost £109.96 on 3 November 2026, about £18 per TB (check live prices yourself). The condition is that you buy with a returns window and test the exact drive that arrives. Here is what that looked like:
- Drive: used 6TB WD/HGST Ultrastar DC HC310, model HUS726T6TALE6L4, SATA, from a business seller on eBay UK.
- Listing: Used, “Good Condition, Perfectly Working. Wiped.”, with 60 days to return it.
- On arrival: 26,993 power-on hours (3 years 28 days), 36 power cycles, and zero reallocated, pending or uncorrectable sectors.
- Tests: SMART extended self-test (took 11 hours), then a full Preclear (25 hours 3 minutes). Both passed.
- Result: Disk 5 in my array, which grew from 19 TB to 25 TB. The drive’s power-on hours rose by 45 between my first SMART read on 6 November and the read after Preclear on 8 November; so at least I know the SMART data was working.
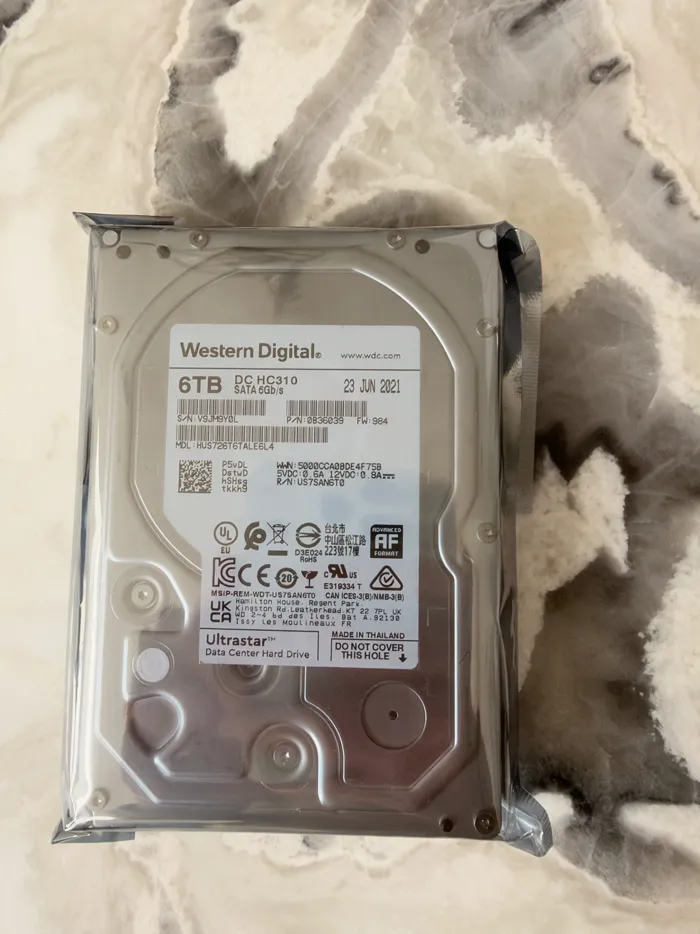
- One thing to know: the listing photo showed another unit of the same model (label dated 2022; mine is dated 2021). The listing gave no date, so I do not count it as a fault, but it was a little misleading, maybe I should push for a bit of a refund, would you?
| When | What happened |
|---|---|
| Tue 3 Nov 2026 | Bought for £109.96 |
| By Fri 6 Nov | Arrived. SMART baseline read at 13:19, extended self-test started at about 13:21 |
| Sat 7 Nov, about 08:05 | Self-test found finished: Completed without error |
| Sat 7 Nov, about 08:11 | Preclear started |
| Sun 8 Nov, 09:15 | Preclear report written: Finished Successfully, 25:03:43 |
| Sun 8 Nov, about 10:25 to 10:31 | Added to the array as Disk 5 and formatted |
I’m sharing this here, but in all honesty, even if you purchased a brand new drive, you should follow all the same steps, you will just be less likely to do so!
What is a used enterprise hard drive?
It is a drive that was built for servers and data centres and has been resold. The label on mine says “Ultrastar Data Center Hard Drive”. Mine cost about £18 per TB on 3 November 2026: check live prices on what is on eBay right now before you decide. I wrote the longer argument in refurbished vs new drives: is it worth the risk and enterprise vs consumer drives for a NAS, so take a look there after following through thsi guid.
Two things to know before you buy:
- SATA or SAS. Check which one the listing says. A SAS drive needs a SAS controller; mine is SATA and plugged into a normal SATA port.
- “Used” is not “tested”. It said it was working, but I like to know, for sure, and even a brand new drive can fail. That is why the rest of this article exists.
Used, refurbished, recertified. Sellers use these words in different ways and none of them tells you the state of the one drive that arrives. Mine was listed as “Used”, so I treated the condition as unknown until the tests said otherwise. And given I would expect a ‘refubished’ thing to be opened up and fully cleaned, but you’re not going to do that to a HDD, what does ‘refurcished’ even mean for a HDD, a quick wipe down?
Parity covers one failed drive in Unraid, but it is not a backup. Keep copies of anything you cannot replace (the 3-2-1 backup rule explains how).
If you are still choosing where to buy, start with where to buy used and refurbished drives in the UK, or have a look at what is on eBay right now.
The drive I bought: HUS726T6TALE6L4
The listing title was a string of model names: 6TB HGST Western Digital HUS726T6TALE6L4 DC HC310 3.5” SATA HDD. The Unraid Identity tab reads it as an HGST Ultrastar HC310/320: 6.00 TB, 7200 rpm, SATA 6.0 Gb/s, 512e (512 byte logical, 4096 byte physical sectors). I know HGST are a good data centre brand, so took the plunge.
HUS726T6TALE6L4: what I saw, and what I did not check
A model number is easy to mix up, so here is what I can and cannot tell you. Everything in this table was read from my own drive in Unraid:
| Spec | Value |
|---|---|
| Capacity | 6 TB |
| Speed | 7200 rpm |
| Interface | SATA 6.0 Gb/s |
| Sector format | 512e (512 byte logical, 4096 byte physical) |
I did not measure anything else on that list myself. The rest comes from Western Digital’s own Ultrastar DC HC310 data sheet (PDF), which covers the whole HC310 line, so these are the manufacturer’s figures for the model:
| Spec (from the data sheet) | Value |
|---|---|
| Cache (data buffer) | 256 MB |
| Recording | CMR (conventional magnetic recording), 4-disk air-filled design |
| Rated reliability | 2 million hours MTBF, 0.44% annual failure rate, rated for 24x7 use |
| Warranty | 5 years limited (when sold new) |
| Power | 7.0 W operating, 5.9 W idle (typical) |
| Noise | 2.9 Bels idle, 3.6 Bels operating (typical) |
| Sustained transfer rate | up to 255 MB/s |
| Operating temperature | 5°C to 60°C |
Two warnings about those numbers. WD says the MTBF and failure rate “do not predict an individual drive’s reliability”, so they say nothing about the one that lands on your doormat. And the 5-year warranty is for a drive bought new: it does not follow a used drive that has been resold on eBay. What protected me was the 60-day return window, which is why I tested inside it.
The data sheet also explains the model number, which is worth knowing because sellers often list several near-identical strings. Here is HUS726T6TALE6L4 read with WD’s key:
| Part | Meaning |
|---|---|
| HUS | H = Western Digital, U = Ultrastar, S = Standard |
| 72 | 7200 rpm |
| 6T | 6TB is the largest capacity in this series |
| 6T | this model is 6TB |
| A | generation code |
| L | 26.1 mm tall (the usual 3.5-inch height) |
| E6 | 512e, SATA 6Gb/s |
| L | legacy pin 3 configuration, with no Power Disable support |
| 4 | base model: no encryption, Sanitize Overwrite only |
That second-last letter is the one to check if you are putting a used enterprise drive into a home build. Some drives with Power Disable on SATA pin 3 will not spin up on an ordinary power connector, and the data sheet says an L here means my drive does not use that feature, so it should behave like any normal SATA drive. Mine spun up and ran fine in my (puny) server. A 0 in the same place would mean Power Disable is supported, so look at that letter in a listing. The last digit tells you about encryption: a 1 is a self-encrypting drive, and a 4, like mine, is not.
Note that the data sheet only covers the HC310 line. Unraid labels my drive “HC310/320”, I’m goign with the HC310!
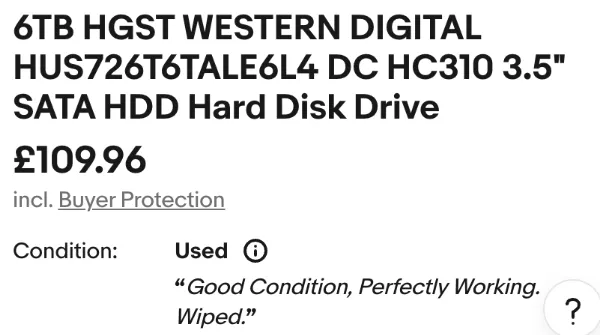
The condition was Used, the seller was a business with a 99.9% positive rating, and the price was £109.96 including buyer protection (about £18 per TB on 3 November 2026).
The line that mattered most to me was the returns policy.

Sixty days, with the buyer paying return postage. My whole test took about two days, so there was plenty of room. A burn-in that finds a bad drive on day five is a refund. One that finds it on day 90 is a problem.
The listing photo showed another unit of the same model
This surprised and dissapointed me, though it is not a fault. The photo in the listing shows a label dated 14 January 2022. The drive that arrived is dated 23 June 2021. Now both are pretty ‘young’ drives, I’ve drives that are 10 years old, heck I’ve an SSD that is 10 years old (and dying fast, so that’s my next purchast) so both are under 5 years old, I’m happy.
| Listing photo | Drive that arrived | |
|---|---|---|
| Label date | 14 JAN 2022 | 23 JUN 2021 |
| Serial number | V9KKVBZL | V9JM9Y0L |
| Firmware (label) | 9G0 | 984 |
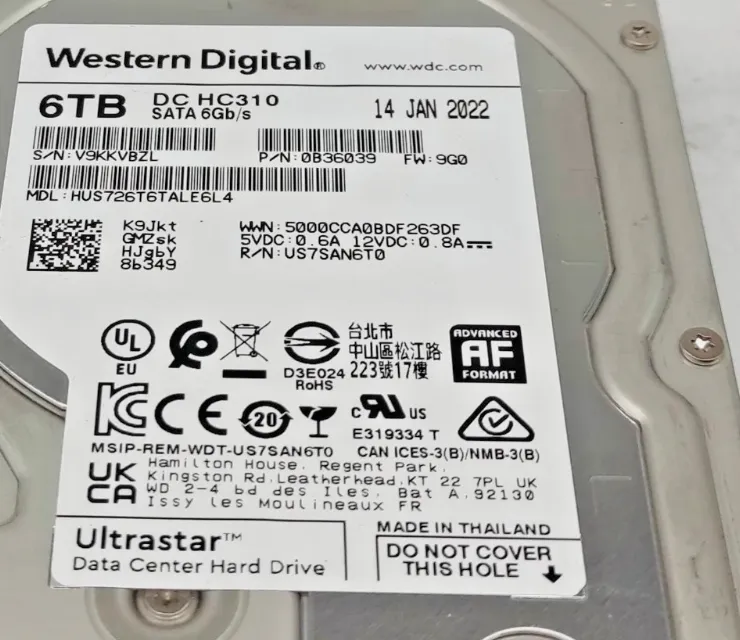
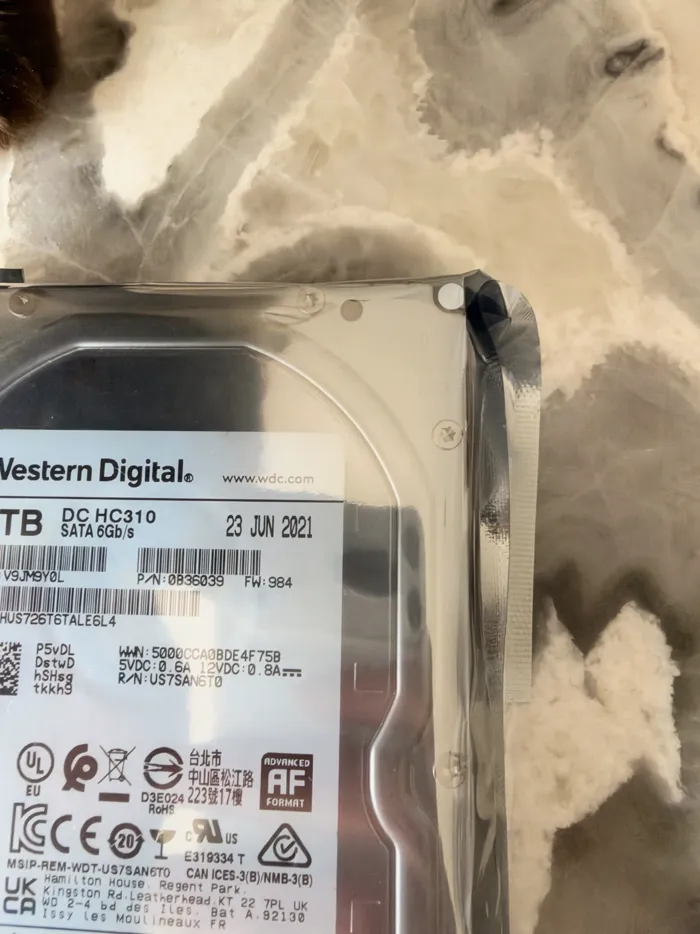
Same model, different unit. As far as I remember it was this same photo when I ordered, so what I saw in the listing was a picture of another drive, not the one I was buying. The listing does not state a date anywhere, so I do not count it as a defect: it looks like a stock-style picture of one drive of that model. Either way, the lesson is the same one I give in how to check a hard drive’s health: do not trust the picture, test the drive in your hand.
How to test a used hard drive: the checklist
This is the order I followed. Each step has its own section below with screenshots.
- Write down the label (model, serial, firmware) before anything else.
- Connect it outside the array and read the SMART Identity and Attributes. Save these numbers as your baseline.
- Run a SMART extended self-test and wait for “Completed without error”.
- Clear the old partitions, then run a full write and read pass (I used Unraid Preclear: pre-read, zero, post-read).
- Read SMART again and compare with the baseline. Any rise in reallocated, pending or uncorrectable sectors means return it.
- Only then add it to the array and format it.
I used the Unraid web interface for the SMART steps. If you prefer the command line, see the smartctl extended test section below.
Step 1: look at it, then connect it somewhere safe
The drive came in an anti-static bag. I checked the model, serial number and firmware on the label and wrote them down, well, took a photo, I’m lazy and less likely to loose that, because you will need the serial later to be certain you are working on the right drive.
I did not put it in the case. I cabled it in from outside and left it on top, which is fine for a few days of testing, and is likely to remain there for several months, but it will be fine.
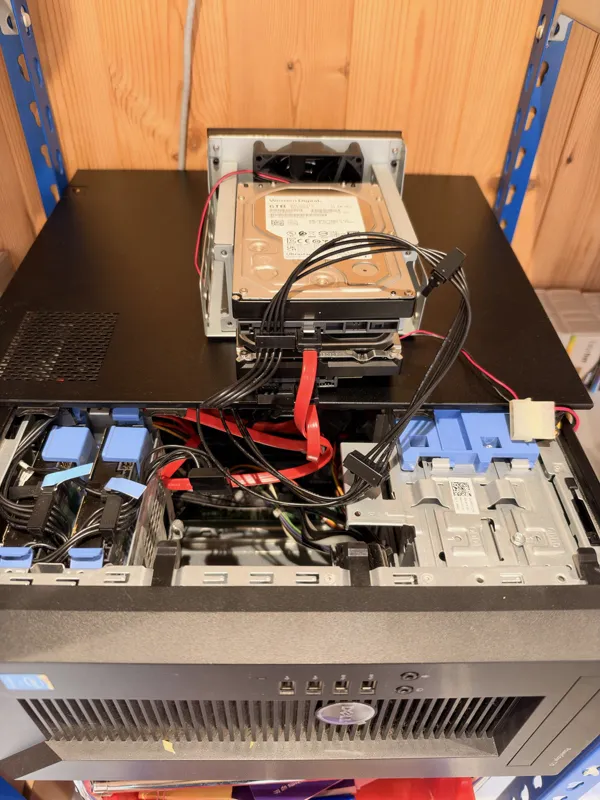
It was noticeably louder than my other drives, especially at start-up: a long, slow, rising whine until it settled. It is a 7200 rpm enterprise drive and most of my other drives are slower NAS models, so some extra noise is expected.
If you do not have a spare SATA port, a bare-drive dock is one way to test a drive on a computer first.

Top-loading dual-bay dock for 2.5" and 3.5" SATA drives and SSDs — drop a bare drive in like a toaster, hot-swap it out when you're done. No tools, no caddy, USB 3.0 or eSATA.
I have this StarTech caddy — it's not the flashiest, it's not the fastest even, but I've had no compatibility problems with over 100 drives, whereas some of the cheaper ones I had in the past did.
Step 2: how to read SMART data on a used hard drive
I booted the server with the drive connected but not assigned to anything. Unraid shows it under Unassigned Devices, with the serial number in the name.
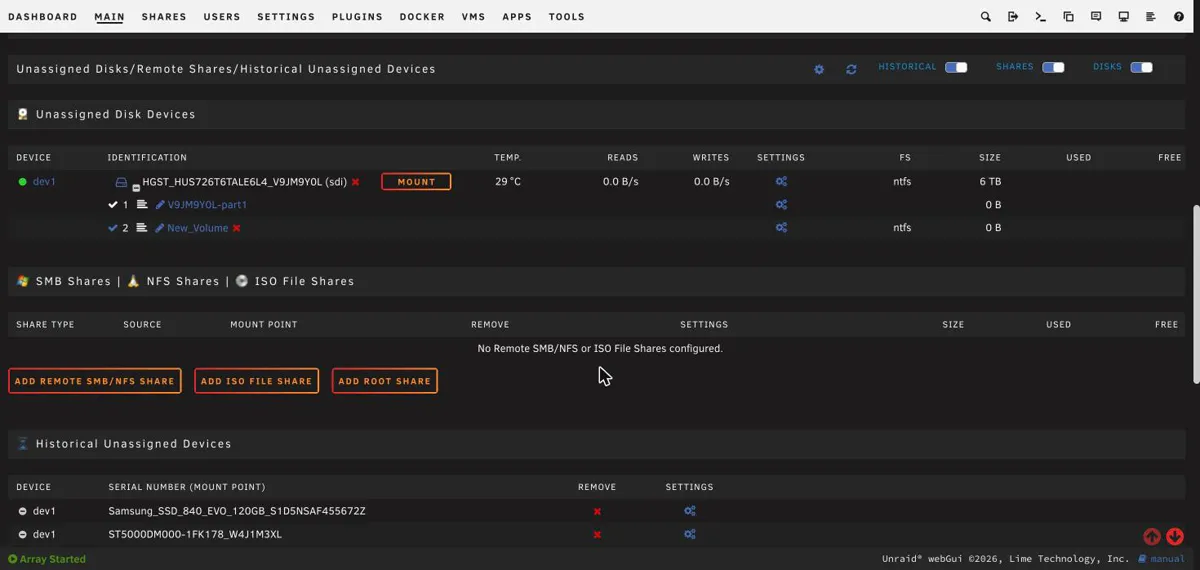
Open the drive’s page and start with the Identity tab.
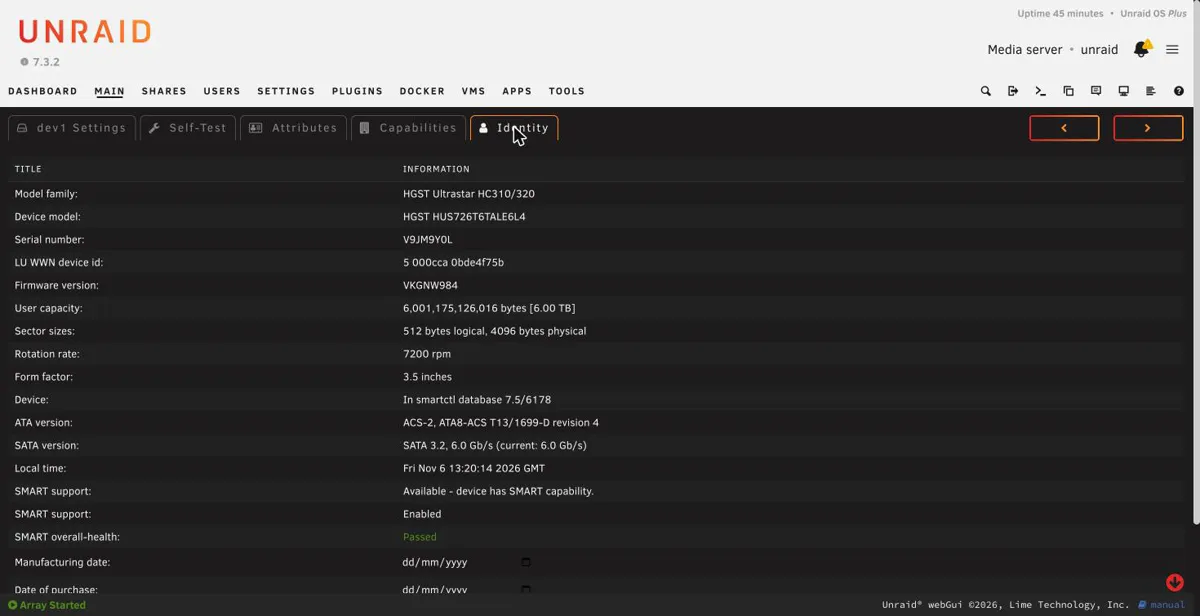
That gave me the model, the serial number (V9JM9Y0L, matching the label), a full-speed SATA link and an overall health of Passed. “Passed” on its own tells you very little, so go to the Attributes tab.
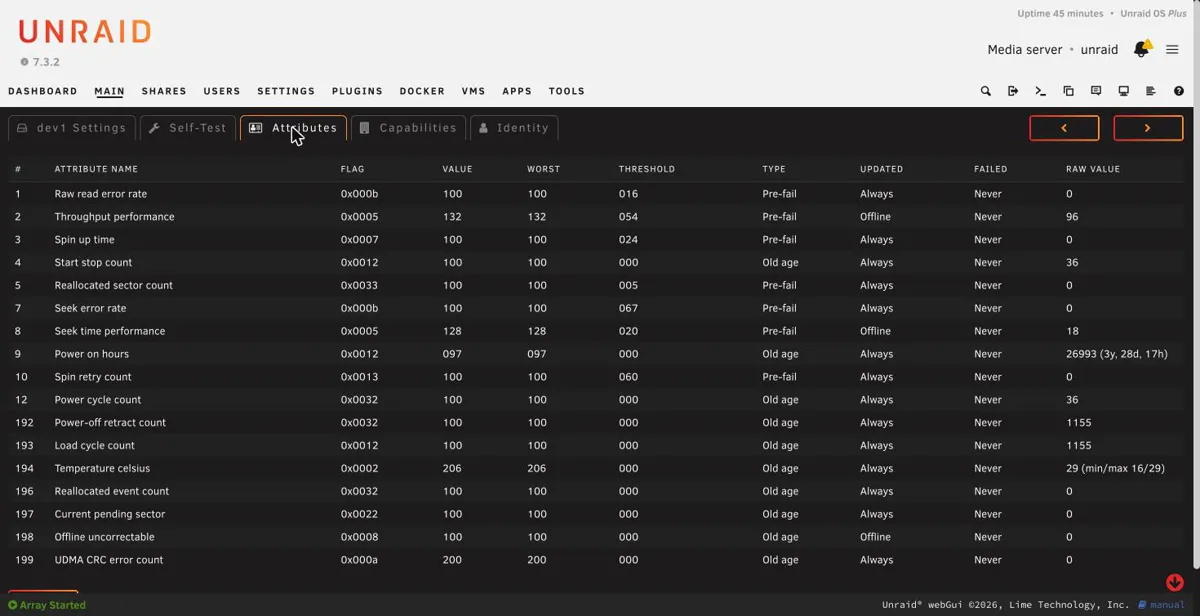
Read on 6 November 2026 at 13:19, before any testing:
| Attribute | My drive | What to look for |
|---|---|---|
| Power-on hours | 26,993 (3 years 28 days) | The real age. This is not new, and the listing never said it was. |
| Reallocated sector count | 0 | Bad sectors the drive has swapped out. Zero is what you want. |
| Current pending sector | 0 | Sectors waiting to be dealt with. Serious if it climbs. |
| Offline uncorrectable | 0 | Errors the drive could not fix. |
| UDMA CRC error count | 0 | Usually a cable fault, not the drive. |
| Power cycles | 36 | Few for 27,000 hours, which suggests it was left running. |
| Self-test log | none ever run | A clean slate. |
| SMART error log | No Errors Logged |
Only 36 starts in 27,000 hours suggests a drive that ran continuously, which is the easy life for a hard drive. My SMART guide explains the numbers in more depth.
Write these numbers down. You will compare against them at the end (or just take a photo and be lazy like me).
Step 3: run a SMART extended self-test
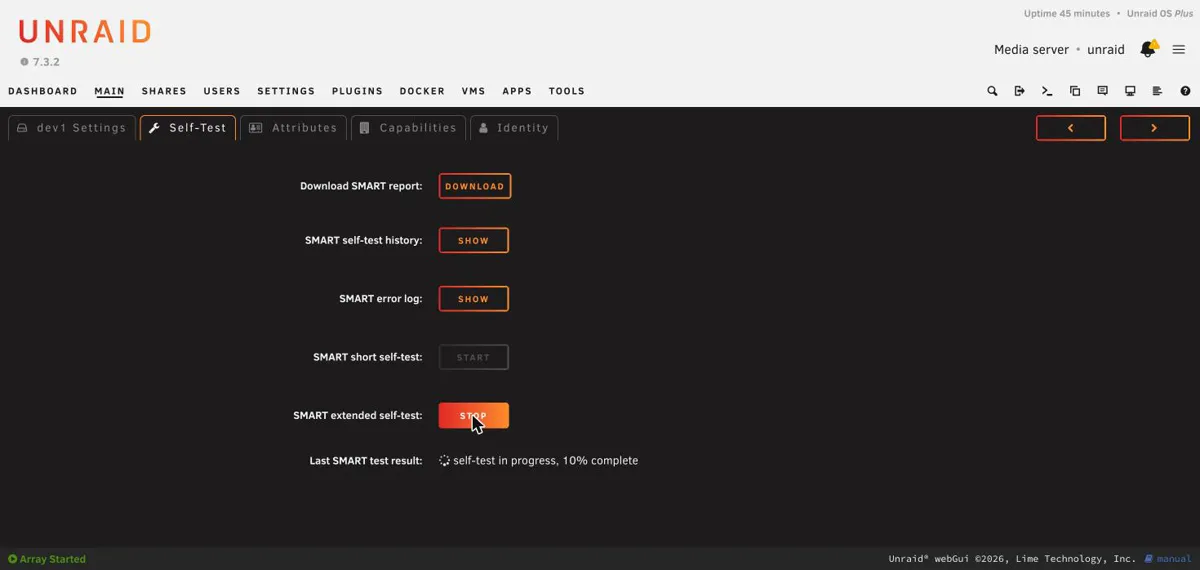
The drive has a built-in test that reads the whole surface. On the Self-Test tab there are two buttons: short and extended. The short one is a quick check and not enough here. Run the extended one and come back the following day.
How to run a smartctl extended test (command line)
These are the standard smartctl equivalents of what the Unraid Self-Test tab does. Replace /dev/sdX with your drive (mine was /dev/sdi, connected directly to a SATA port). I did not run them on this drive, so I have no output of my own to show you; my results below come from the Unraid screens, which are a front end for smartctl.
smartctl -i /dev/sdX          # model, serial, firmware
smartctl -A /dev/sdX          # the attributes table (your baseline)
smartctl -c /dev/sdX          # includes the extended self-test time estimate
smartctl -t long /dev/sdX     # start the extended self-test
smartctl -l selftest /dev/sdX # read the result when it has finished
Run -A before and after and compare reallocated, pending and uncorrectable sectors. In the -l selftest log, look for the status “Completed without error”, the same wording Unraid showed me. smartctl is part of the smartmontools package.
If the drive is in a USB dock or enclosure. I tested on a direct SATA port and never used a dock. The next two points are standard smartmontools guidance, not my own work: some USB bridges need you to tell smartctl the device type, for example smartctl -d sat -a /dev/sdX, and some do not pass SMART commands at all, in which case smartctl reports that SMART is unavailable. A separate point of my own, untested: a test that needs about 10 hours is a long time to depend on a dock staying powered. A direct SATA connection is what I used and know works having had a couple of fights in the past with cheap USB docks.
How long does a SMART extended self-test take?
The drive estimates its own duration. Mine said 624 minutes, about 10.4 hours. I started it at about 13:21 on 6 November and left it overnight. I did not watch for the finish, so I cannot give you the exact minute, only that it had finished by about 08:05 the next morning.
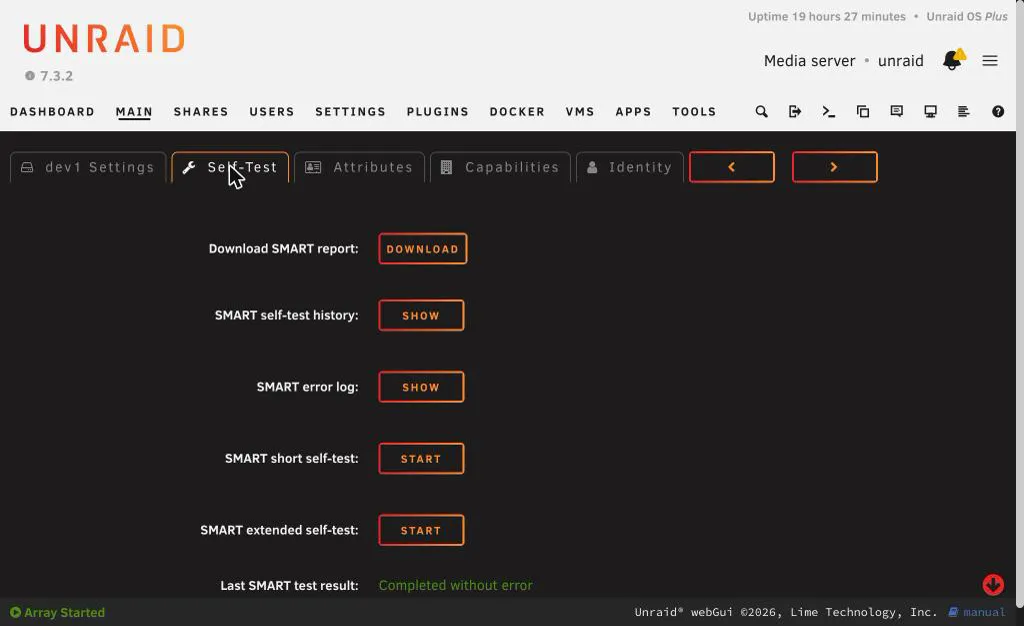
It said Completed without error. The bad-sector counters were all still 0. The only changes were 19 more hours on the clock, one more load cycle (1,155 to 1,156), and a temperature that had peaked at 34 °C during the test. Do not shut the server down or spin the drive down while the test runs.
Step 4: how to run Preclear on a used drive in Unraid
Preclear is an Unraid plugin that reads the whole drive, writes zeros over it, then reads it all back. Mine was the “Unassigned Devices Preclear” plugin. On a used drive I think it is the most useful thing you can do, because it makes the drive read and write every sector, which is where a weak drive tends to show itself. badblocks is the other common way to do this on Linux.
Here is the confusing part, and the reason I wrote this down. There was no Preclear button. My drive row only had a Mount button and a settings cog, because the seller’s Windows partitions were still on it: an NTFS partition called “New Volume”. “Wiped” meant formatted in Windows, not securely erased. Preclear does not appear for a drive that has partitions.
The way round it is the red X next to the drive name. That is a different “Clear Disk” from the one inside Preclear:
- The red X removes the partition table. It takes seconds and asks you to type Yes.
- “Clear Disk” inside the Preclear dialog writes zeros over the whole drive. That is the part that takes a day.
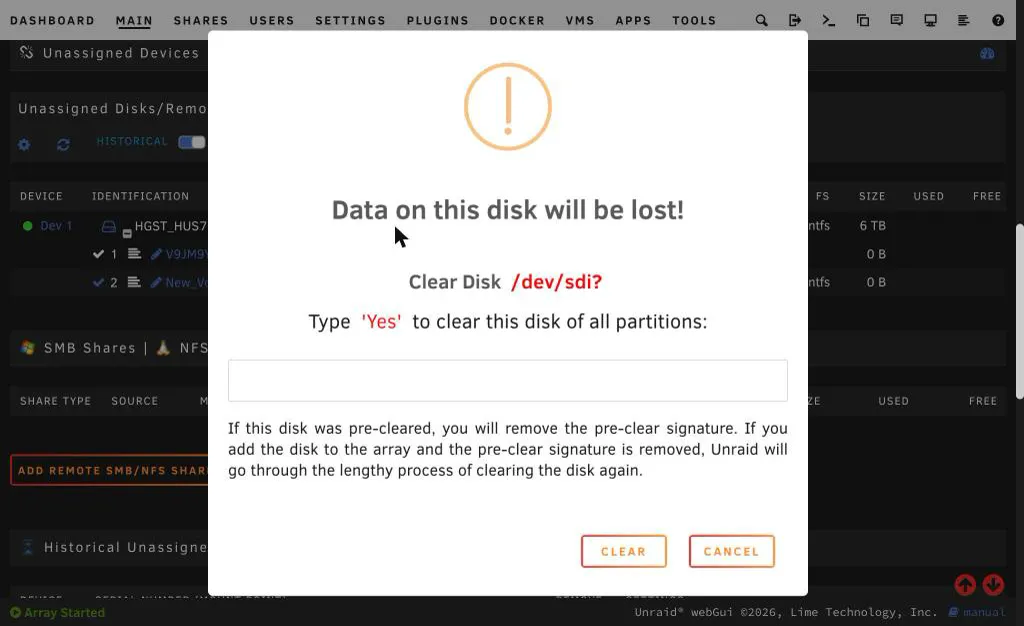
Do the red X before Preclear and never after it. The dialog warns that if the disk was pre-cleared you will remove the pre-clear signature, and Unraid will have to clear it all over again. Check the device and the serial against your label first. The dialog only shows the device name (mine said /dev/sdi), and drive letters can change after a reboot.
After the partitions were gone, a small icon appeared next to the drive name.
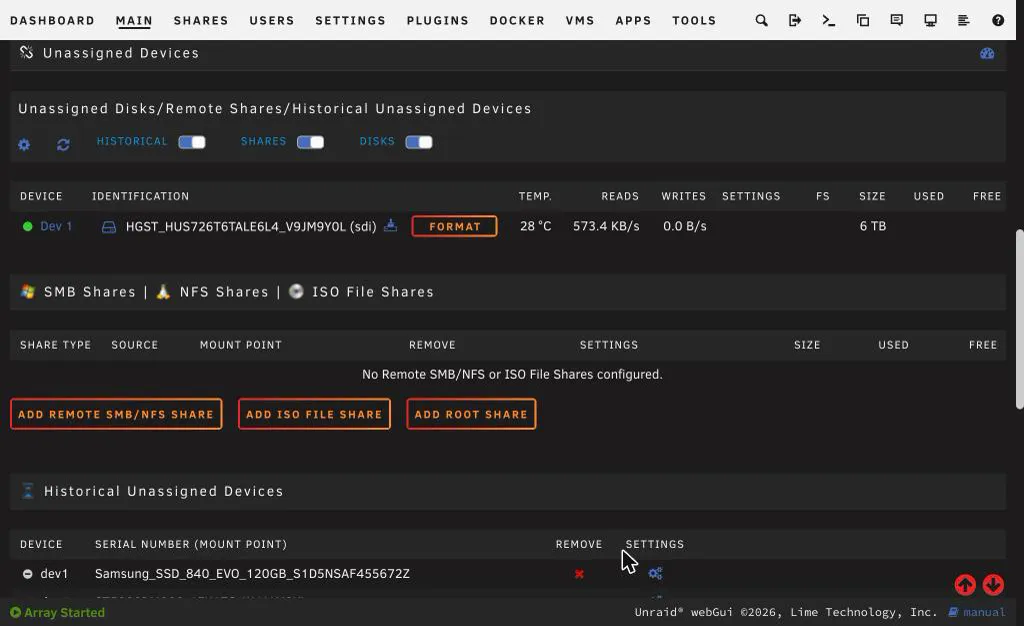
Hover over it and it says “Start Preclear”. The big button next to it says Format. Do not click that.
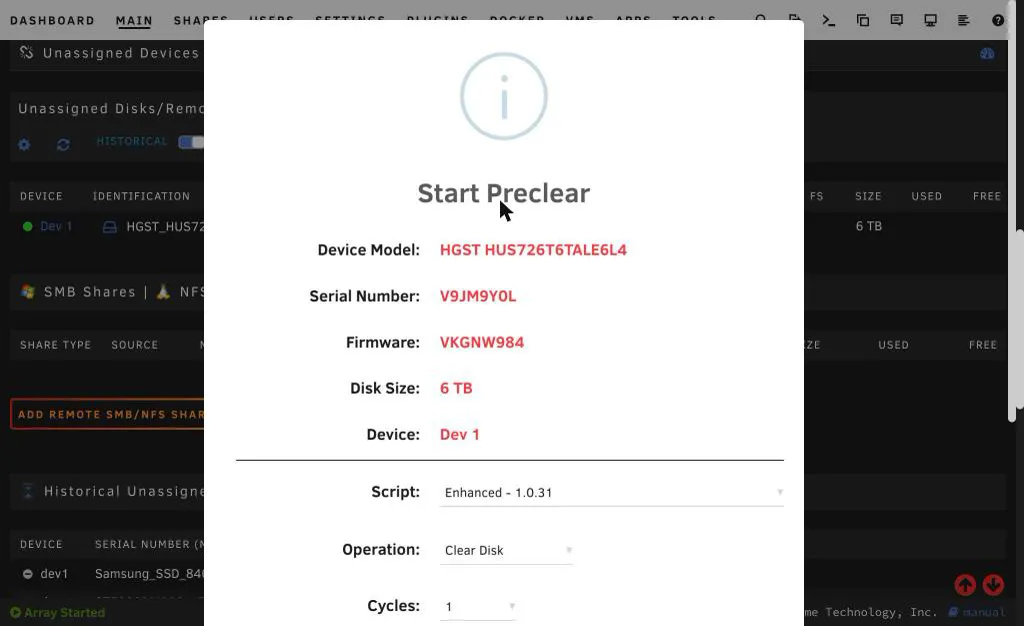
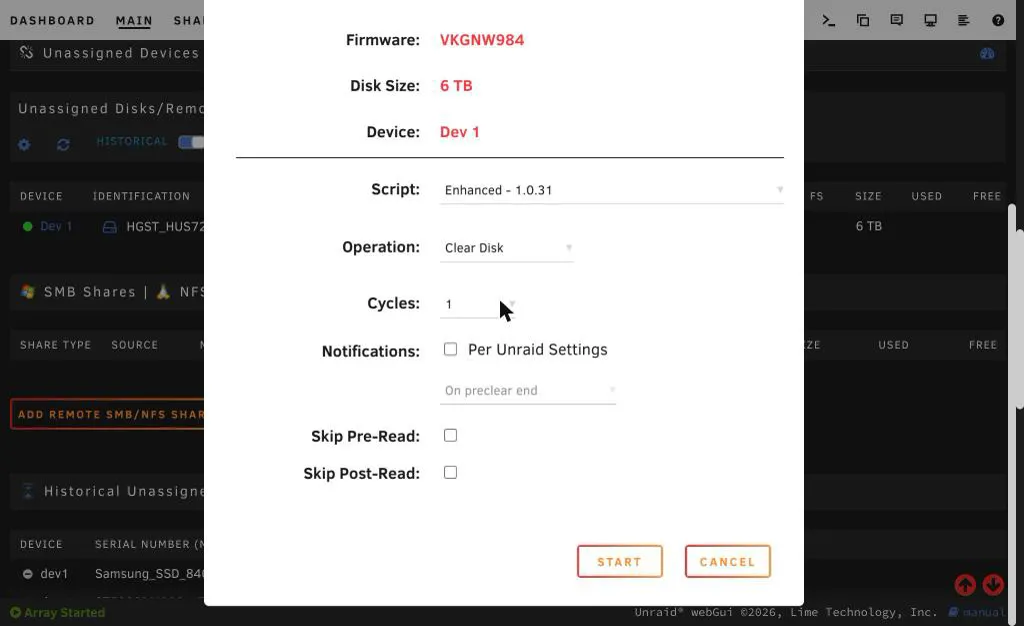
I used the Enhanced script, the Clear Disk operation and one cycle, and left both Skip boxes unticked (that is the default). That gives three full passes: a pre-read, the zeroing, and a post-read. Ticking Skip is faster but a much weaker test.
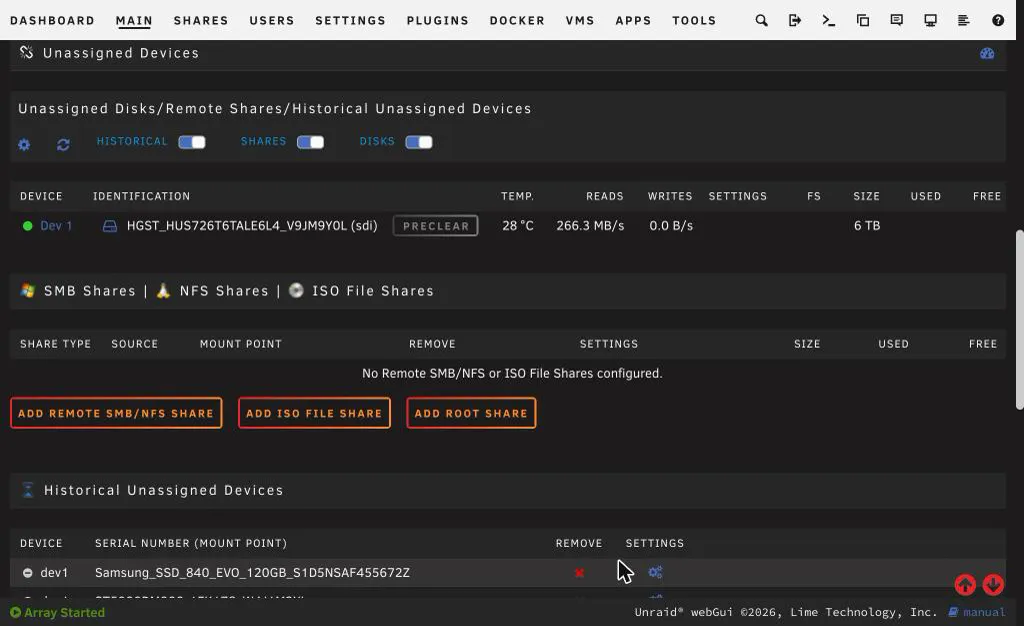
I started it at about 08:11 on Saturday 7 November.
How long does Unraid Preclear take?
Mine took 25 hours 3 minutes for 6TB.
| Step | Time | Average speed |
|---|---|---|
| Pre-read verification | 8:21:01 | 199 MB/s |
| Zeroing the disk | 8:21:25 | 199 MB/s |
| Writing and verifying the signature | not timed in the report | |
| Post-read verification | 8:21:00 | 199 MB/s |
| Total | 25:03:43 |
It starts fast (over 250 MB/s on the outer part of the platters) and slows to about half that by the end of each pass. To estimate yours: capacity divided by your drive’s average speed, times three. For me, 6 TB at about 199 MB/s is 8 hours 21 minutes a pass, or about 4 hours per TB on this drive. Another drive will have a different average speed, so treat my 4 hours per TB as one example and work your’s out too.
Step 5: read the Preclear report
When it finishes, Unraid writes a report to the flash drive. I read it in the web terminal and show the important parts here.
Unraid Server Preclear of disk V9JM9Y0L
Cycle 1 of 1, partition start on sector 64.

Step 1 of 5 - Pre-read verification:            [8:21:01 @ 199 MB/s] SUCCESS
Step 2 of 5 - Zeroing the disk:                 [8:21:25 @ 199 MB/s] SUCCESS
Step 3 of 5 - Writing Unraid's Preclear signature:                   SUCCESS
Step 4 of 5 - Verifying Unraid's Preclear signature:                 SUCCESS
Step 5 of 5 - Post-Read verification:           [8:21:00 @ 199 MB/s] SUCCESS

Cycle elapsed time: 25:03:42 | Total elapsed time: 25:03:43

S.M.A.R.T. Status (device type: default)
ATTRIBUTE               INITIAL  CYCLE 1  STATUS
Reallocated_Sector_Ct   0        0        -
Power_On_Hours          27012    27037    Up 25
Temperature_Celsius     28       30       Up 2
Reallocated_Event_Count 0        0        -
Current_Pending_Sector  0        0        -
Offline_Uncorrectable   0        0        -
UDMA_CRC_Error_Count    0        0        -

Report generated on: November 08, 2026 at 09:15:40
--> ATTENTION: Please take a look into the SMART report above for drive health issues.
--> RESULT: Preclear Finished Successfully!
To read yours, open the Unraid web terminal and run the following, with your own file name:
ls /boot/preclear_reports/
cat /boot/preclear_reports/preclear_report_<serial>_<date>.txt
Mine said:
- Pre-read, zeroing, writing the signature, verifying the signature and post-read: all SUCCESS.
- Total elapsed time: 25:03:43. The report was written at 09:15 on 8 November.
- A small SMART table with every bad-sector counter at 0 before and after. Its “initial” power-on hours (27,012) are higher than my baseline (26,993) because the report takes its snapshot when Preclear starts, which was after the 19 hours of self-test.
- The last line: “RESULT: Preclear Finished Successfully!”
It also printed “ATTENTION: Please take a look into the SMART report above for drive health issues”. An odd thing for a ‘success’, but I think it’s just general advice/info.
The folder is a handy record too: Unraid keeps one report per Preclear, so that’s all your drives, so you can look back at when each drive was burned in.
Step 6: compare SMART with the baseline
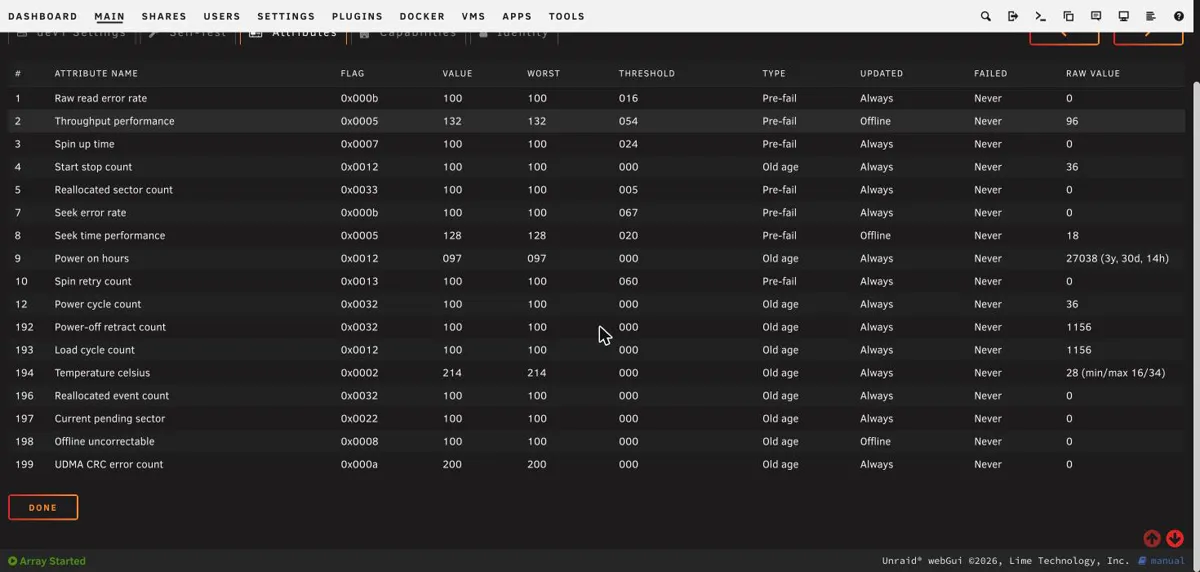
| Before (6 Nov) | After the whole burn-in (8 Nov) | |
|---|---|---|
| Power-on hours | 26,993 | 27,038 |
| Reallocated sectors | 0 | 0 |
| Pending sectors | 0 | 0 |
| Uncorrectable | 0 | 0 |
| CRC errors | 0 | 0 |
| Power cycles | 36 | 36 |
| Temperature peak | 29 °C | 34 °C (reached during the self-test) |
After an extended self-test and three full passes of 6TB, there were no new bad sectors and no errors. This drive passed, and I kept it.
What would have made me return it (my own rules): a failed self-test, any rise in reallocated, pending or uncorrectable sectors, or the drive dropping out during Preclear. A rising CRC count is usually the cable, so I would swap the cable and retest before blaming the drive (yes, had this one before, very confusing); and rmemeber, we’re agains the return window click here.
Step 7: add it to the array and format it in Unraid
This is where the warnings start, so here is every step. I added it as a new data disk, Disk 5. (Replacing a failed drive is a different process and I am not covering it here. I’ll do that another time, as it’s way more scary than this)
- Stop the array. Your Docker containers stop with it (mine took my Docker containers including Plex down), so picking the right time is fun too.
- Assign the drive. On the Main page, use the dropdown for the next empty slot. It offered exactly one drive, which made it easy. Pick by serial number.
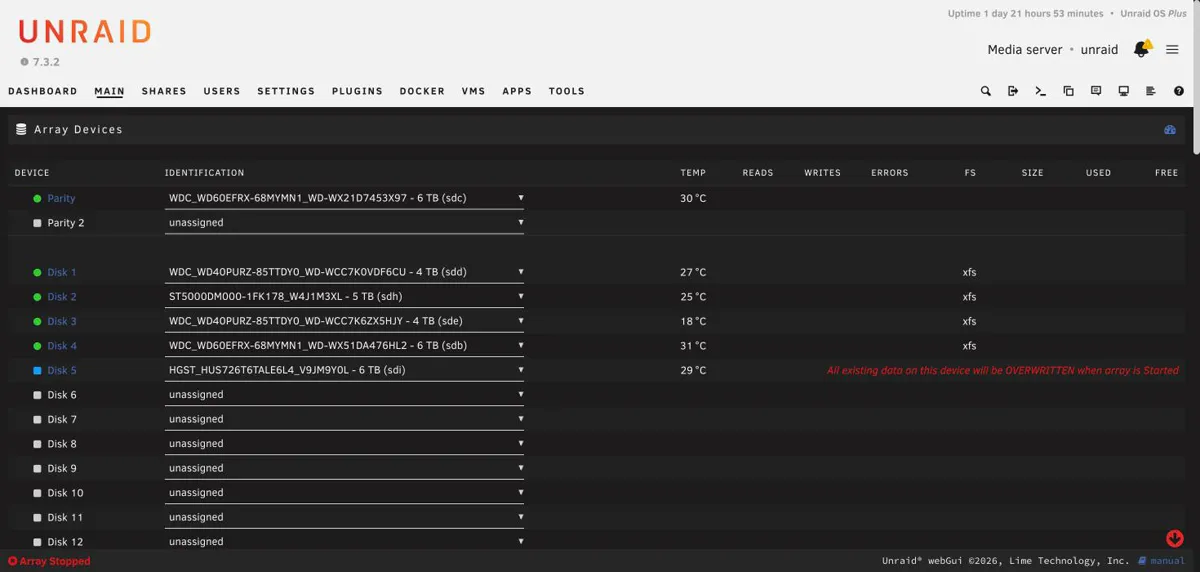
Unraid shows red text: “All existing data on this device will be OVERWRITTEN when array is Started.” I would expect it for any disk you add. Be sure it is the right drive, check the serial, and carry on.
- Start the array. The Array Operation panel says “New data disk(s) detected” and that Start will “start Disk-Clear of new data disk(s)”.

Because Preclear had written its signature, there was nothing left to clear and the array was up in about 15 seconds. Without Preclear, Unraid would have run Disk-Clear on a 6TB drive, which takes hours as mentioned; although it give you the option of just zeroing the disk if I remember correctly, so takes one third of the time, but without really checking, so imo this is the right way to do things.
- Format it. The new disk shows “Unmountable: unsupported or no file system”.
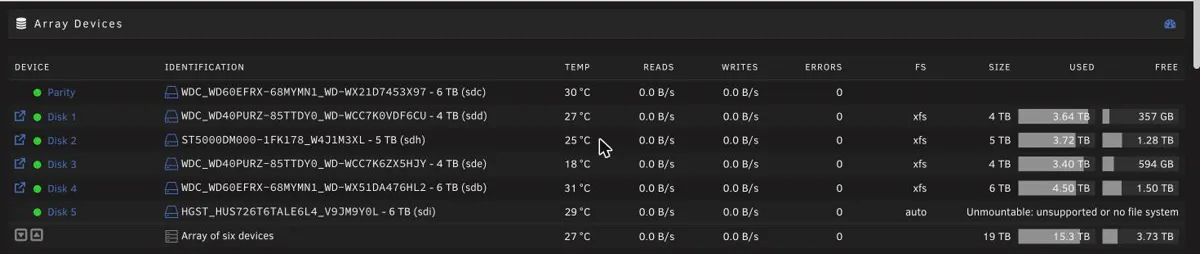
How to format a new disk in Unraid (“Unmountable: unsupported or no file system”)
The disk has no file system yet, which is normal for a new disk.
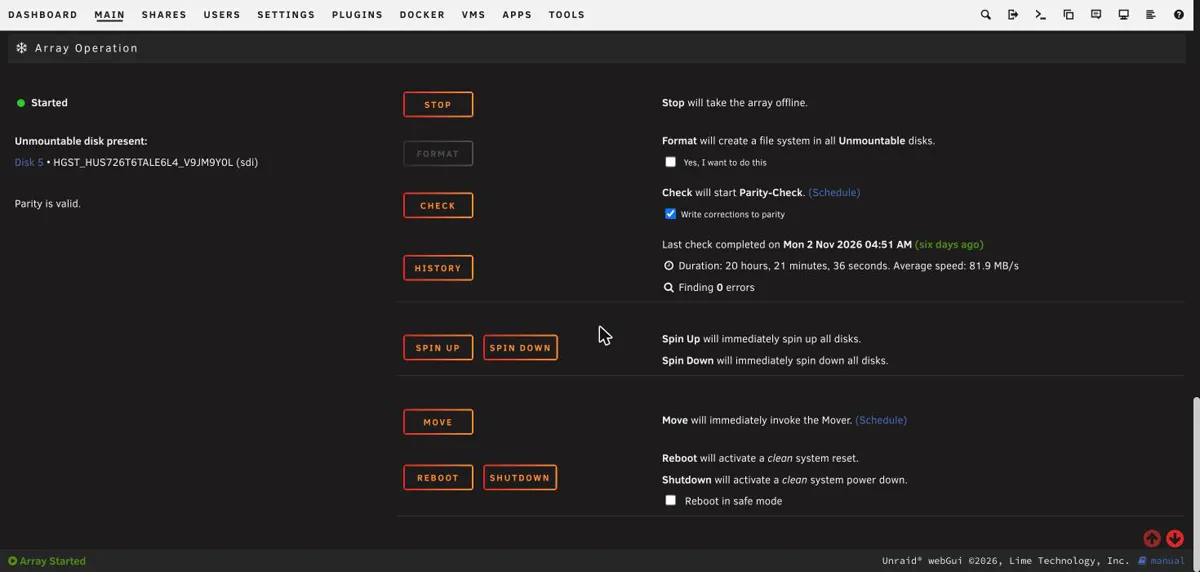
Read the list under “Unmountable disk present” before you do anything. The Format button creates a file system on all unmountable disks, not just the one you are thinking of. Only the new disk should be listed. If any other disk is on that list, stop, because that is a problem and not a new disk.
Tick “Yes, I want to do this” and you get another warning.
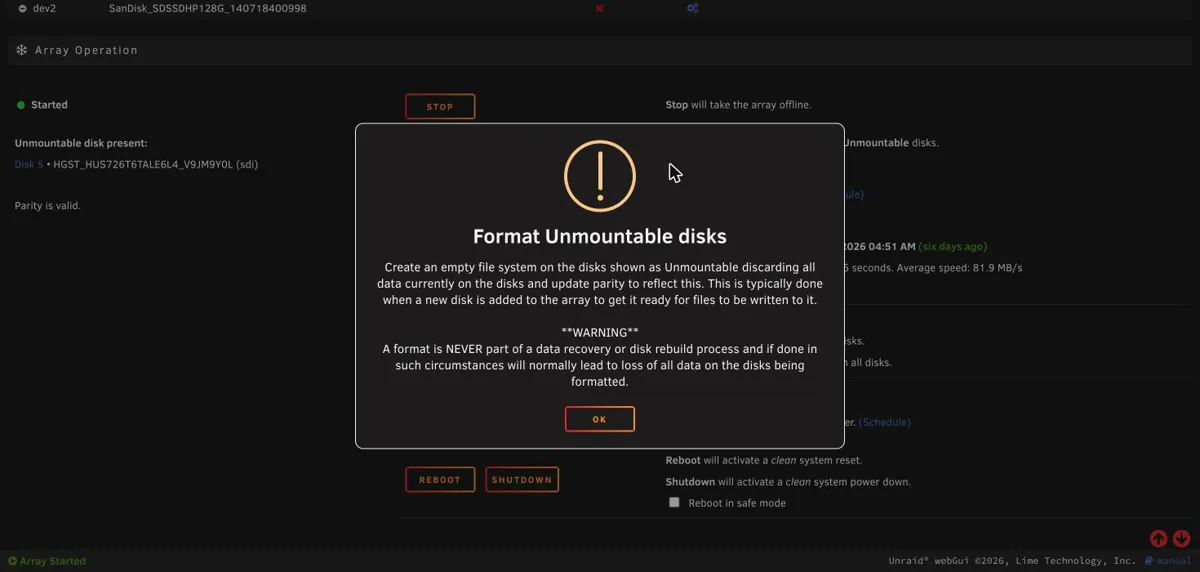
It says: “A format is NEVER part of a data recovery or disk rebuild process and if done in such circumstances will normally lead to loss of all data on the disks being formatted.” That is the right warning for someone trying to fix a broken disk. It does not apply to a new, empty one. I clicked OK, then Format. It used XFS (my server’s default, the same as my other data disks) and took about a minute and a half.
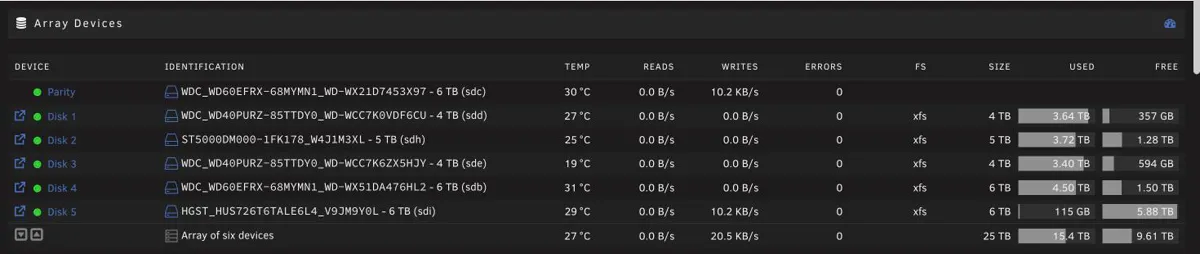
Disk 5 came up as XFS with 5.88 TB free (about 115 GB shows as used, which is file system overhead, I should do a whole thing on how unRAID and similar things work, I’ve done a lot of research into my lost storage space in the past, but yeah, it’s necassary and just the way it is, get over your lost 115GB!). The array went from 19 TB to 25 TB and the free space from 3.73 TB to 9.61 TB. Parity stayed valid and there were no errors on any array disk.
The Unraid warnings that confuse people
The short checklist, in the order you meet them:
- No Preclear button? The drive still has partitions. Clear them with the red X first.
- Two different “Clear Disk” options. The red X removes partitions in seconds. The one in the Preclear dialog writes zeros for hours.
- The Preclear control is a tiny icon, and the big button next to it is Format.
- “All existing data will be OVERWRITTEN” and “Unmountable: unsupported or no file system” are what a new disk looks like before it is formatted.
- Format formats every unmountable disk. Read the list first.
- “Wiped” meant the Windows partitions were still there. Preclear’s zero pass is the real overwrite.
- The Preclear report ends with “ATTENTION” even when it passed. Read the SMART table.
What I would check before buying another used enterprise drive
- A returns window longer than your test. Mine needed about two days of waiting for the tests, and I had 60 days.
- The exact model number in the listing title, so you know what the drive is (mine: HUS726T6TALE6L4).
- SATA or SAS, to match your ports or controller.
- A baseline. Write down the SMART numbers the day it arrives.
- A full write and read pass, not just a format.
- The serial number, every time you click something that can erase a drive.
- Backups. Parity is not a backup (3-2-1 rule).
It is still a used drive with three years on it, and it can fail tomorrow, just like a brand new drive can. That is why you have parity, and backups for the things you cannot replace. For more on choosing, see my enterprise vs consumer drives answer.
Frequently asked questions
Short answers; the steps above have the detail and screenshots.
Are used enterprise hard drives safe? They can be, if the seller accepts returns and you test the drive before you trust it. My used 6TB Ultrastar had 26,993 power-on hours, no bad sectors, and passed an extended self-test and a full Preclear. One drive is one data point, and any used or new drive can fail later, so keep backups.
How do you test a used hard drive? Record the SMART attributes the day it arrives, run an extended self-test, write and read the whole surface (Unraid Preclear, or badblocks), then read SMART again and compare. Reallocated, pending and uncorrectable sectors should still be 0. If any climbed other than say power on hours, return the drive.
How long does Unraid Preclear take on a 6TB drive? 25 hours 3 minutes on my 6TB drive: three passes of about 8 hours 21 minutes at an average of 199 MB/s, roughly 4 hours per TB on this drive.
How do I run a smartctl extended test, and how long does it take? Run smartctl -t long /dev/sdX, then read the result with smartctl -l selftest /dev/sdX and look for Completed without error. The drive estimates its own time: mine said 624 minutes (about 10.4 hours). I used the equivalent Unraid buttons, so I did not run these commands on this drive.
Do I need to Preclear a used drive before adding it to Unraid? No, it is optional. Unraid will run Disk-Clear on a new data disk itself. Preclear moves that work earlier and doubles as a stress test, which is the reason to do it on a used drive.
Why does Unraid say Unmountable: unsupported or no file system on a new disk? Because the disk has no file system yet, which is normal for a new disk. Check that only the new disk is listed under Unmountable disk present, then tick the confirmation box and use Format.
What is the HUS726T6TALE6L4? The model number of the 6TB Western Digital / HGST Ultrastar DC HC310 SATA drive I bought: 7200 rpm, SATA 6.0 Gb/s, 512e. Match the whole model string in a listing title.
Can you use an enterprise hard drive in a home server? Mine is SATA and worked in an ordinary SATA port, but it is louder than my other drives. Check whether a listing says SATA or SAS first, because a SAS drive needs a SAS controller.
Is a used enterprise hard drive the same as a refurbished or recertified one? Sellers use these words differently and none tells you the state of the one drive you receive. Mine was listed as Used and showed 26,993 power-on hours. Test whatever you buy.
Related reading
- How do you check a hard drive’s health (SMART)?
- Refurbished vs new drives: is it worth the risk?
- Enterprise vs consumer drives: which for a NAS?
- Where to buy used and refurbished drives in the UK
- What is the 3-2-1 backup rule?
- What file system should you use for a NAS?
- Browse enterprise and NAS drives
